NextGen Loads Planning Modulen here
The purpose of the Loads Planning Module is to help LDCs plan loads to ensure that all delivery locations stay above their respective Minimum Delivery Pressures, as well predict load losses during cases of outages or other emergency situations such as line ruptures.
Predicting Lost Loads If No Action Is Taken
If supplies into a system are limited due to outages or other emergencies, or deliveries are projected to be much higher than planned, or there is a rupture in the system, the Load Loss Prediction feature in NextGen can be used to predict exactly which loads in the system will wind up being shut in due to low pressure if no action is taken.
In Transient simulation, load loss prediction is pretty straight forward since this is in essence a transient occurrence. The nodes or meters that hit their Min Delivery Pressure first in time (or Max Supply Pressure for supplies) will get shut in first, which in turn will help alleviate the problem because less gas will travel through that part of the system which should help raise the pressure in that part of the system (or lower it in supply areas) for the next time step. On subsequent time steps, if the pressures start going up and exceed the Min Delivery Pressure at these nodes and meters that were shut in, we would then start turning their deliveries back on.
Load loss prediction in Steady State is a bit more problematic because we are trying to solve what is in essence a transient problem with a steady state solution. If all we did was shut in every node and meter that violated their Min Delivery Pressure, we would totally alleviate the problem, but we would in all likelihood have over predicted the total loads lost.
So in steady state we have to be a little smarter in choosing which of the nodes or meters to shut in, and NextGen has load loss algorithms that start with the areas of the most severe min delivery pressure violations and work their way outward over a series of iterations to approximate what will happen over time before the system stabilizes.
Preemptively Taking Action to Minimize Lost Loads
In many cases however, you may be able to take preemptive action in order to minimize the amount of loads lost, or shed low priority loads in favor of keeping high priority or critical loads on line, and this is where the Load Planning features can help.
The Load Planning features use optimization algorithms in tandem with steady state runs to predict which zones, or which individual nodes and meters can be shut in during low pressure conditions to minimize losses.
In cases where there is a rupture in the system, obviously we will need to isolate the zone in which the rupture occurred, but further losses may be incurred if the zone being isolated was being used to feed gas into other zones in the system, and the Load Planning feature can be used to not only predict what will happen when one zone is isolated, but also suggest other remedial action that may be taken to minimize the total loads lost.
With Zone load planning NextGen will examine all isolation zones as well as the locations in which Minimum Delivery Pressure violations are occurring, and will use optimization algorithms and a series of runs to determine which isolation zones could be shut in so as to minimize total load shut ins.
If you have smart meters and the ability to remotely shut in specific nodes and meters, another very useful feature of the Load Planning Module is to try and run studies in which loads are preemptively shut in on a per Node or Meter basis according to Priority. Thus you can not only shut in loads so as to minimize total losses, but also shut in low priority loads in various parts of the systems so as to keep high priority loads such as hospitals or emergency locations on line.
By using these features NextGen can generate a list of nodes and meters that can be given to gas controllers to shut in preemptively so that other higher priority nodes and meters won’t have to be shut in.
If you do not have control over who to shut in, then all nodes and meters should be set to the same priority (Override Sequence Number), and we can use the zone level logic to see what zones will have to be shut in, or can be preemptively shut in, to minimize losses.
Using all of the above criteria, NextGen’s Load Planning Module uses proprietary optimization algorithms and a series of steady state runs to converge to a solution, and will generate a list of Zones, or Nodes and Meters for Node/Meter level load shedding, that will be shed for predictive lode loss, or can be preemptively shut in for preemptive type load planning.
In all cases, a final steady state run is made in which the selected nodes and meters are shut in to verify the results, and you can then view which nodes and meters were shut in in the Reports, and if needed, export out the results to Excel (or a database) for further action.
To make a Load Planning or Load Loss Predicting run, you must first make sure your model is set up properly, then create a separate scenario in which to launch load planning (you cannot use the Base scenario). Press the Load Planning Mode option under the Advanced Analysis ribbon button in the Steady State section to pop up the Load Planning panel, and you can then pick the type of Load Planning run you want to make and relevant options, then press the Load Planning Run button in the Steady State ribbon to launch the load planning run.
Load Loss Prediction
Setting up your model for Load Loss Prediction
To make use of Load Loss Prediction the only thing you need to do is make sure that all of the delivery nodes in the system have a valid Min Delivery Pressure. It is assumed that the delivery can no longer be made if the line pressure drops below this value.
What Load Loss Prediction Does
This type of load shedding run can be used to predict which Node and Meter level loads will be shed during low pressure conditions if no action is taken. For example if a supply into the system is cut, but the deliveries in the system maintain their existing levels, the deliveries will start to eat into the system line pack and the pressures in the system will start to drop.
Individual nodes and meters will begin to hit their Minimum Delivery Pressure and when they do, gas can no longer be taken at those locations and so their deliveries will go to zero.
The reason this is called Load Loss Prediction is because these deliveries are being predicted to be forced off line due to low pressures, and no action is being taken to alleviate the situation by taking any kind of preemptive action.
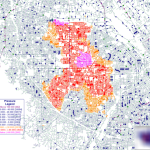
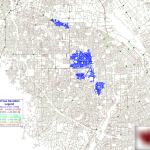
As loads are shed, the pressures in the system will eventually stabilize and stop dropping. The image below left shows the results of a Load Loss Prediction run where the areas shown in blue are the areas where nodes and meters were forcibly shut in because the line pressures fell below Minimum Delivery Pressures thus forcing the shut ins.
As you can see, this area is much smaller than the original areas that had pressure violations and were color coded in orange, red, and purple on the right. This is because as some of the loads are shed, flows are reduced, and this helps bring the line pressures back up.
Preemptive Load Planning
Setting up your model for Preemptive Load Planning
This type of load planning is Node/Meter level load shedding and assumes that you have control over individual nodes and meters and can shut them in on demand.
To make use of Preemptive Load Planning, you need to make sure that all of the delivery nodes in the system have a valid Min Delivery Pressure. It is assumed that the delivery can no longer be made if the line pressure drops below this value.
Globally set the Overrides Allowed flag for all Nodes (or parent Nodes for Meters) that you want to participate in load planning to “Enable Load Shedding”. If you do not want certain nodes or meters to participate in load planning, be sure to set their Overrides Enabled to No, or set their Override Sequence Number to the highest numbers so they will be shed last.
The Override Sequence Number should also be used to categorize low and high priority groups of nodes and meters that are participating in load planning. 0 is lowest priority and those nodes and meters will be shut in first, and higher priority ones will be shut in last. Multiple nodes or meters can have the same priority (Override Sequence Number), thus for example all hospitals can have a value of 100, other critical infrastructure locations to 90, but maybe set all non-critical commercial locations such as restaurants to 10.
What Preemptive Load Planning Does
Assuming you have the ability to control which nodes or meters can be shut in, this type of load planning run can be used to determine which nodes or meters should be shut in so as to alleviate the Minimum Delivery Pressure violations.
Note however that only those nodes and meters that are in the Violation Region will be considered as load planning candidates, where the Violation Region is the Pressure Isolated Region in which the most severe Minimum Delivery Pressure violations are occurring.
It is possible that some remote nodes and meters that are far outside of the area that is experiencing Minimum Delivery Pressure violations and in another pressure isolated region could be shut in to alleviate the low pressure problem, but this is outside the scope of what the Load Planning Module can do at this time.
Note also that if you have more than one pressure isolated region in which Minimum Delivery Pressure violations are occurring, you may have to make multiple Load Planning Runs. The first run will alleviate the violations in the region containing the most severe violations. The second run will go on to the next worse region and shed loads in that region, and so on.
When shutting in loads in a Violation Region NextGen will start with the lowest priority (lowest Override Sequence Number) nodes and meters and shut in those first. It will shut in all nodes/meters in the lowest priority level before shutting in any nodes/meters in the next priority level.
Load Planning Search Radius
With Node/Meter level Preemptive Load Planning a Search Radius can be defined in the Load Planning Options which will limit the loads shut in within one priority level to those within that radius from the worse pressure violation location, before it goes on to the next priority level. Thus all loads shut in at all priority levels will be within that radius.
The reason for using this is that even though some low priority nodes or meters may be part of the Violation Zone, the farther away they are from the low pressure violation area, the less impact shutting them in will have on raising the pressure levels.
Thus if the low pressure violations are all occurring within a 5 mile radius, it does not make much sense to cut a low priority load 15 miles away. The Load Planning Search Radius can be used to fine tune the load planning and limit how far away we go to shut in loads.
Preemptive Zone Load Planning
Setting up your model for Preemptive Zone Load Planning
As with the other the other load planning options, for Zone level Load Planning make sure that all of the delivery nodes in the system have a valid Min Delivery Pressure. It is assumed that a delivery can no longer be made if the line pressure drops below this value.
Also since this is zone load planning where entire zones are isolated and shut in, make sure that you have all isolation zone defined as “Regions” using the Region definition tools and have added all needed isolation valves to actually isolate the different zones when needed, so that NextGen can close all valves leading into a zone when it needs to shut in that zone.
The easiest way to do this is to make sure you have inserted all isolation valves into the model, then select the Operational Pressure Isolations option from the Map Color Coding button submenu, then go to the Map Region Select button submenu and press Create Region(s) From Isolations. This will create all of the zones or regions that can then be used in Zone Load Planning.
What Preemptive Zone Load Planning Does
Preemptive zone load planning will look at where the most severe Minimum Delivery Pressure violations are occurring and try to automatically shut in one or more zones to alleviate the violations. Different combinations of zones will be attempted so as to minimize the total amount of loads that will be lost.
NextGen will try to identify the most promising zones to shut in and shut those in first, but will also try other combinations of nearby zones to see if they work better.
The Load Planning run may be able to just shut in a single zone to alleviate the problem, but if needed multiple zones will be shut in.
Obviously shutting in entire zones is not a desirable thing to do, but in cases of emergency where supplies feeding into a distribution system have been curtailed or one or more regulators feeding supplies into the system have been disrupted, or a rupture has occurred, and we know that one way or the other loads are going to be shut in, it’s going to be better to have some degree of control over what zones to shut in so we can try to minimize the impact.
Manual Zone Load Planning
Setting up your model for Manual Zone Load Planning
Set up is identical to Preemptive Zone Load Planning. Make sure that all of the delivery nodes in the system have a valid Min Delivery Pressure. It is assumed that a delivery can no longer be made if the line pressure drops below this value.
Also make sure that you have all isolation zone defined as “Regions” using the Region definition tools and have added all needed isolation valves to actually isolate the different zones when needed, so that NextGen can close all valves leading into a zone when it needs to shut in that zone.
The easiest way to do this is to make sure you have inserted all isolation valves into the model, then select the Operational Pressure Isolations option from the Map Color Coding button submenu, then go to the Map Region Select button submenu and press Create Region(s) From Isolations. This will create all of the zones or regions that can then be used in Zone Load Planning.
What Manual Zone Load Planning Does
This is similar to Preemptive Zone Load Planning, but rather than letting NextGen determine what zones to shut in, you can manually pick which zones to shut in from the list of Regions in the Load Planning Panel by unchecking them.
Zones that are checked have all their loads enabled and their isolation valves set to their default (open) state, but zones that are unchecked have their loads shut in and are isolated from the rest of the system by having all of their isolation valves closed.
This feature provides you with a good way to verify that the automatic Preemptive Zone Load Planning worked correctly, but also gives you a means to see if you can do better than the automatic zone planning. Maybe there is a combination of zones you can come up with that is better than the one NextGen came up with and in which less loads are shed.
Reenable All Elements
When performing any kind of Load Planning run, be it Node/Meter or Zone load planning, NextGen shuts in nodes, meters, and zones by placing the nodes and meters (and isolation valves when relevant) in Override 1000 mode so it can retain the original set point values and revert back to them if the nodes, meters, or zones are reenabled. Override 1000 basically tells the run engine to ignore the normal InFlow Set Point for the node or meter and assumes zero InFlow.
If you continue making runs with this scenario in either Load Planning mode or Normal run mode, these overrides are retained and the loads will stay shut in.
To cancel all of the shuts ins you have made in Load Planning Mode and have all of the nodes, meters, and zones revert back to their full loads and reopen any isolation valves that may have been closed in zone load planning, just press the Reenable All Elements button. This will bring the scenario back to its pre Load Planning state.
Make Overrides Permanent
What if you performed one or more load planning runs but now want to take the results of the load planning run and start a whole new scenario or simulation with the nodes, meters, and or zones still shut in as a starting point?
Pressing the Make Overrides Permanent button will permanently shut in these zones where rather than being shut in in override mode, it’s as if you had gone in and manually set the InFlow Set Points for all of those nodes and meters to zero, and manually closed all of the isolation valves isolating the shut in zones.
Note that this action cannot be undone, so this Scenario now has these nodes, meters, and zones permanently shut in, so it’s usually a good idea to create a backup copy of the scenario before doing this.
